Well Plates
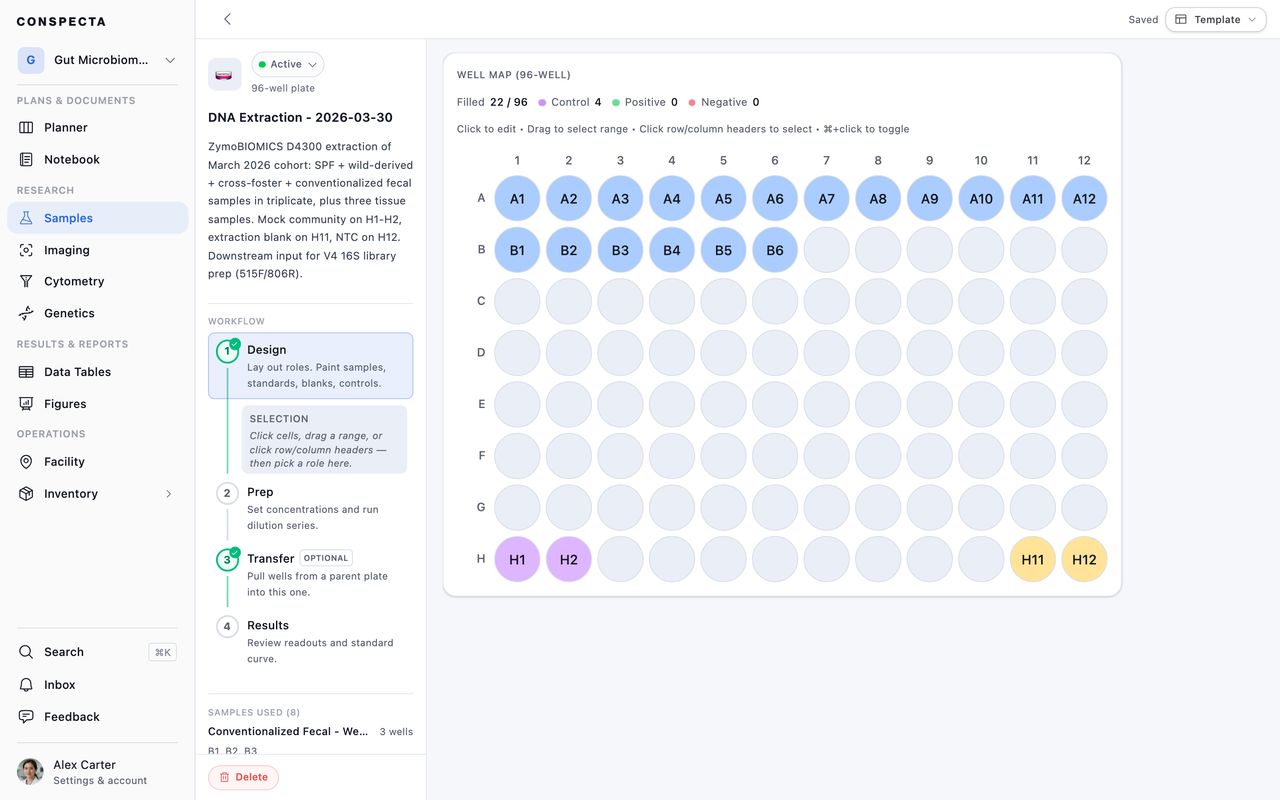
A plate is a layout of which wells hold what, at what concentration, and what the reader said about each one. Creating a Well plate sample opens a workspace built around the well map.
The workspace takes you through four steps: lay the plate out, prep it, optionally pull material in from another plate, then read the results back in.
Creating a Plate
New sample, then Well plate, asks for a name, a scope, and a size. The formats are 6, 12, 24, 48, 96, and 384 wells, each showing its grid so you can see what you're picking.
If your project already has plate templates of that size, they're offered here too, so a standard layout can be in place before the plate exists. Click a template to pick it, or the ⓘ on its row to open it in full. Use this template from there picks it and brings you back. Press Create plate and you land in the workspace.
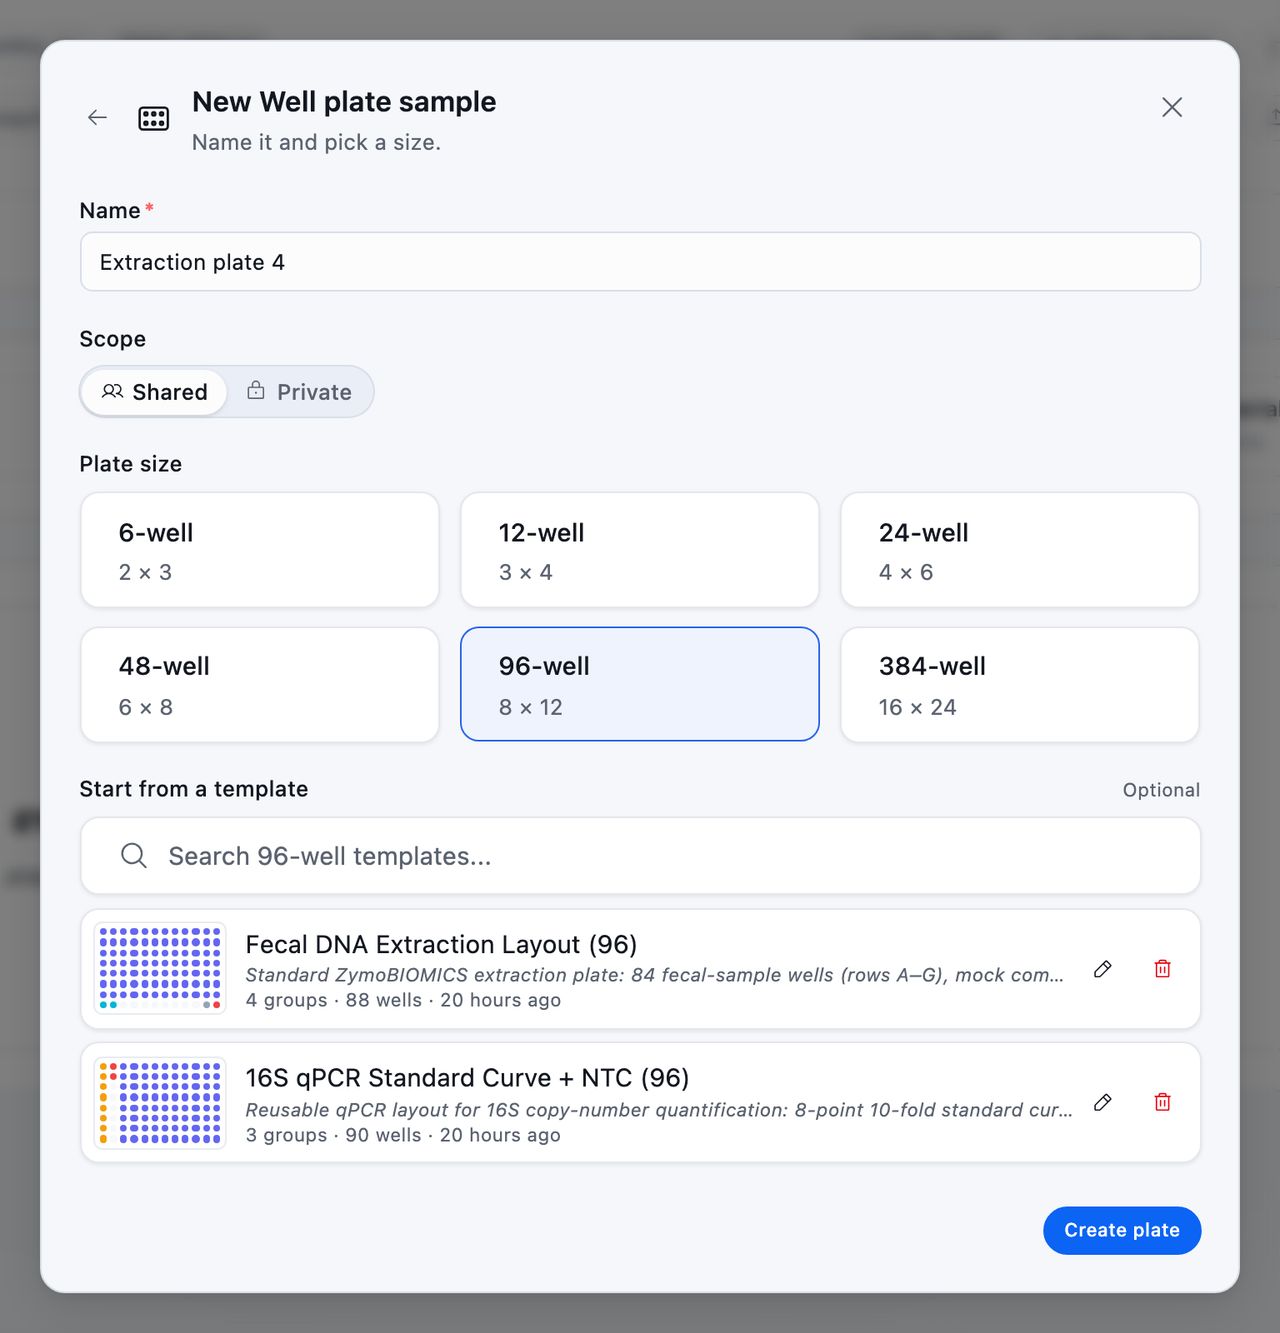
The size can't be changed afterwards.
A plate can also start from a note. Link a plate in the note's Insert menu, then New plate, asks for the same name, size and layout, links the plate on the note, and opens it here to lay out, with a way back to the note. On the note the plate shows its map, colored by role. See Write Lab Notes.
The Workflow
The sidebar lists four steps, and Conspecta ticks each one off from the plate's own data. Click any step at any time, in any order.
| Step | What it's for |
|---|---|
| Design | Say what each well holds. |
| Prep | Set concentrations and run dilution series. |
| Transfer | Pull wells from a parent plate into this one. Optional. |
| Results | Review readouts and standard curve. |
Whichever step you're on also recolors the map: roles during Design, concentration during Prep, and a heatmap of readings during Results.
On a phone the four steps sit in a row above the map, and the step you're on keeps its tools in a bar along the bottom of the screen. Tap the handle at the top of that bar to give the tools more room, for the dilution calculator or the results file drop, and tap it again to give the room back to the map.
The plate's name is in the header beside the properties button at the top left, and its description, status and Delete are behind that button.
Selecting Wells
Everything in the workspace acts on the wells you have selected. Clicking a well selects that well on its own. Turn on Multi-select, above the map, and clicking a well adds it to the selection or takes it back out, so you can build up a set such as a pair of controls at opposite corners, a row of standards, or a block of replicates.
Two gestures ask for several wells outright, and they work whether Multi-select is on or off, turning it on as they go:
- A row or column label takes the whole line, and releases it when you click it again.
- A mouse drag across the grid paints a block.
With a mouse, Shift-click extends a rectangle from the last well you picked. Turning Multi-select back off clears the selection. Clicking the background clears it too.
On a touchscreen a drag scrolls the map, which is how you reach the right-hand columns of a 96 or 384-well plate on a phone. Tapping works as clicking does with a mouse, so tap to pick a well, and tap a row or column label to take the whole line.
Tip: The tools only appear once something is selected. If a step shows no controls, select a well and they come back.
Design
Paint the selected wells with a role: Sample, Standard, Blank, or Control. Clear role empties them again. Controls can be narrowed further to Positive, Negative, Max, or Min, and a positive or negative control can carry a dose index when you're running a series.
Link sample attaches a sample from Samples to every selected well. The well then shows that sample's name, and the sample's own Connections show the plate.
Once wells are linked, that same button carries the current sample's name, and clicking it picks a different one. Select wells that link different samples, such as a couple of rows at once, and it reads Mixed samples. Clicking it then sets one sample across all of them.
Replicates are numbered for you. Wells that share a role and a sample become a replicate group automatically, numbered across the plate in reading order. A well left without a partner leaves the group.
A collision warning means the same sample is in wells that aren't replicates. Usually that's the same sample painted under two different roles. The notice names the wells and suggests giving them a matching role so they group properly. Dismissing it hides it until the collision changes, and then it appears again.
Prep
With wells selected, set a concentration and unit (mM, µM, nM, ng/mL, µg/mL, mg/mL, %, or X), and a volume if you're tracking one.
Select a row, set the starting concentration, give a fold factor, and Serial dilution walks the series across the wells in order, each one the previous divided by the factor. It appears once you have more than one well selected.
A dilution calculator sits below, collapsed until you want it. Give it a stock concentration, a target, and a final volume and it gives the volumes of stock and diluent to combine. It's a scratch pad that leaves the plate untouched, so you can work out a number without disturbing the layout.
Transfer
Transfer from another plate pulls material from a plate of the same size into this one, either well-for-well or from one named position to another. You can apply a dilution factor as it comes across, and set how much to take. Once a plate is linked, the step names it above the button, so you can see where the material is coming from before you change it.
Leave the amount blank and the whole well moves. Give an amount and the source loses that amount. Where both plates track volume in compatible units, pooling into an already-full well is mass-balanced, so what the well already held stays in the total.
Transfer records provenance between plates. The plate you transferred from becomes this plate's parent, and it's named in the finished summary.
Results
Drop the plate reader's file onto the Results step. It takes .xlsx and .csv, skips the header rows instruments write above the grid, and finds the block that starts with row labels A, B, C.
Before anything is applied you see how many wells will be updated and from which file, along with a count of any non-numeric cells being skipped. Apply results commits it. If nothing parsed, a message points to the row labels as the usual cause.
When at least two standards have both a concentration and a reading, a Standard curve marker appears.
Applying results completes the plate and locks it. The layout becomes read-only so it stays matched to the readings. There's no confirmation step before this, so import when you're ready. Edit plate unlocks it again.
A completed plate swaps its workflow sidebar for a summary: who completed it and when, how many wells carry results, the breakdown by role, whether there's a standard curve, the samples used, and the parent plate it was transferred from.
Templates
Any layout can become a template, so the next plate of an assay starts from a layout you already built. The Template menu offers Apply template, Save as new template, Update template, and Manage templates.
A template captures the wells that have something in them: their positions, their role grouping, and their concentrations and volumes. The samples, the results, and the replicate groups stay with the plate they came from.
Applying and Updating a Template
Templates are matched to plate size, so Apply template and Update template offer only same-format layouts. Choosing one opens the template, with the layout drawn large beside a legend of its well groups, its size, who saved it and when, and its description.
The footer button follows the menu entry you came from:
- From Apply template the footer button is Apply template. When the plate already has wells filled in, a note beside that button says that roles at the template's positions will be overwritten, so you can check that against the map before applying.
- From Update template the footer button is Overwrite template, which replaces that template's wells with the current plate's layout and keeps its name and description.
An applied template comes back as all Sample wells. Positions, concentrations, and volumes are restored, but standards, blanks, and controls return as ordinary samples and need repainting.
Renaming, Describing and Deleting a Template
The ⋮ menu at the top of an open template offers four choices:
- Rename
- Add description (or Edit description)
- Update with current plate when a plate is open
- Delete
Each one opens in a row under the tabs.
Delete asks once, then moves the template to the project Trash, where it can be restored for 30 days. Plates already built from it keep their layout. Every change, including a restore, lands in the template's history.
Plates Built From a Template
The Connections tab draws the template in the connections graph with every plate built from it, and lists those plates beneath as Used by, newest first, each a link to the plate. A plate made from an earlier version of the template is marked behind latest, so you can see which plates predate a change to the layout.
The list starts from when this tracking was introduced. A plate laid out by hand to match a template is not counted as built from it. A plate's own Connections tab links back to the template it came from.
Signing Off a Template
The Activity tab holds the template's comments, review requests, and sign-off, alongside that history of renames and layout changes. An approval is tied to the template as it was when approved, so a later rename or relayout flags it as possibly out of date until someone approves it again. Rows in every template list show Approved with the approver's name once a template has a current sign-off.
Seeing Every Template
Every layout the project has saved is listed in one place. Templates, first in the Samples workspace header, opens Plate templates, which lists every saved layout at every plate size, searchable by name and description. Manage templates in a plate's Template menu opens the same list.
Each row draws the layout in miniature beside its format and how many wells it has configured, so you can tell two similar maps apart, and clicking a row opens the template.
Applying a layout happens on the plate itself, from the Template menu or as you create the plate, where the layouts offered match that plate's size.
The button appears for members who can edit the project, since renaming and deleting change what everyone else works from.
Editing a Plate Someone Else Has Open
Everything saves as you work, and two people can lay out the same plate at once.
If you both changed the same well, or the same field, the plate shows Some fields were updated by another user. with each version under Keep mine and Use theirs, and a well is named by its position, such as Well A2. Nothing else you change saves until you choose and click Apply.
When a save doesn't go through, the top bar reads Not saved with a Retry button.
Exporting
A completed plate has Export Excel, which writes a workbook with the plate's details and a row per filled well: position, row, column, status, sample ID and name, result value, and notes. The workbook leaves out roles, concentrations, and volumes, so use it for the readings and the sample mapping.