Track Your Samples
The Samples workspace is the register of every specimen in a project: cell cultures, tissue, microbial isolates, environmental samples, plates. It records what each one is, where it's stored, what state it's in, and what it's been through, including what it came from and the results it produced.
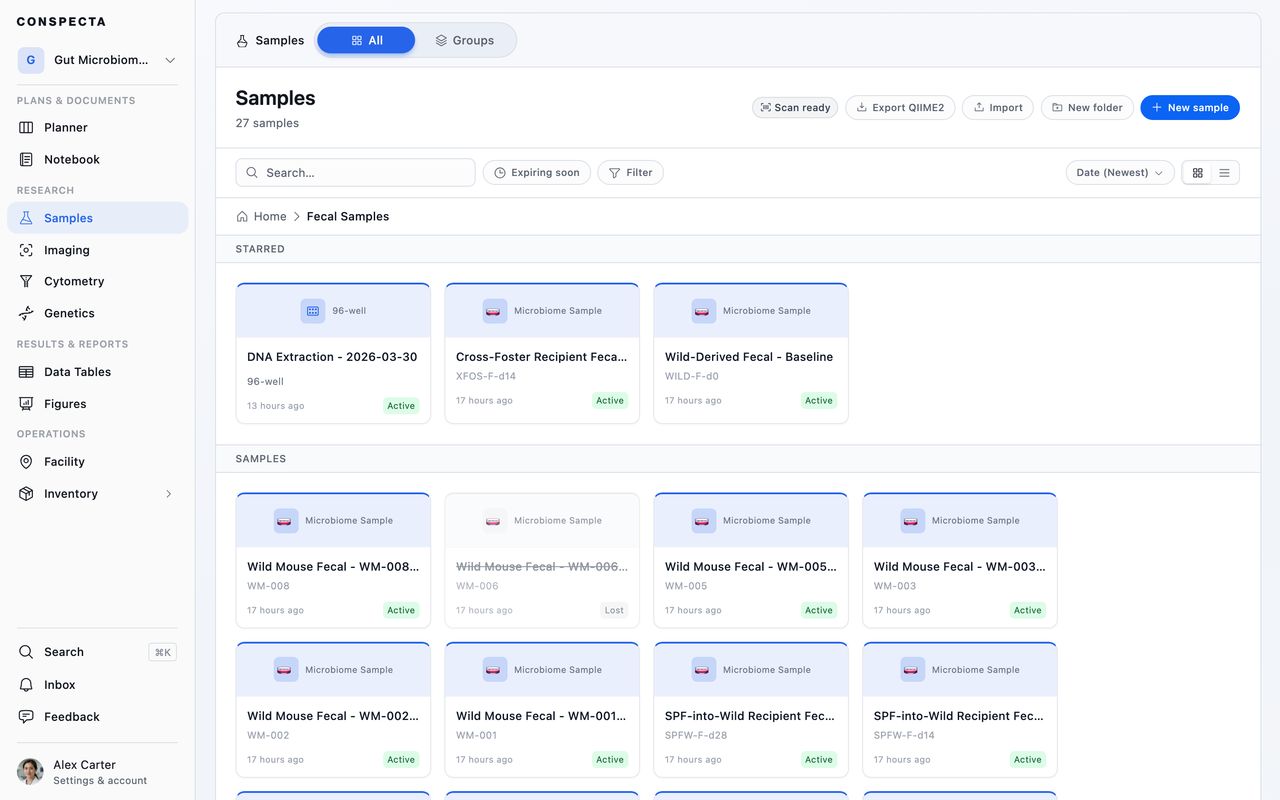
Registering a Sample
- Click New sample.
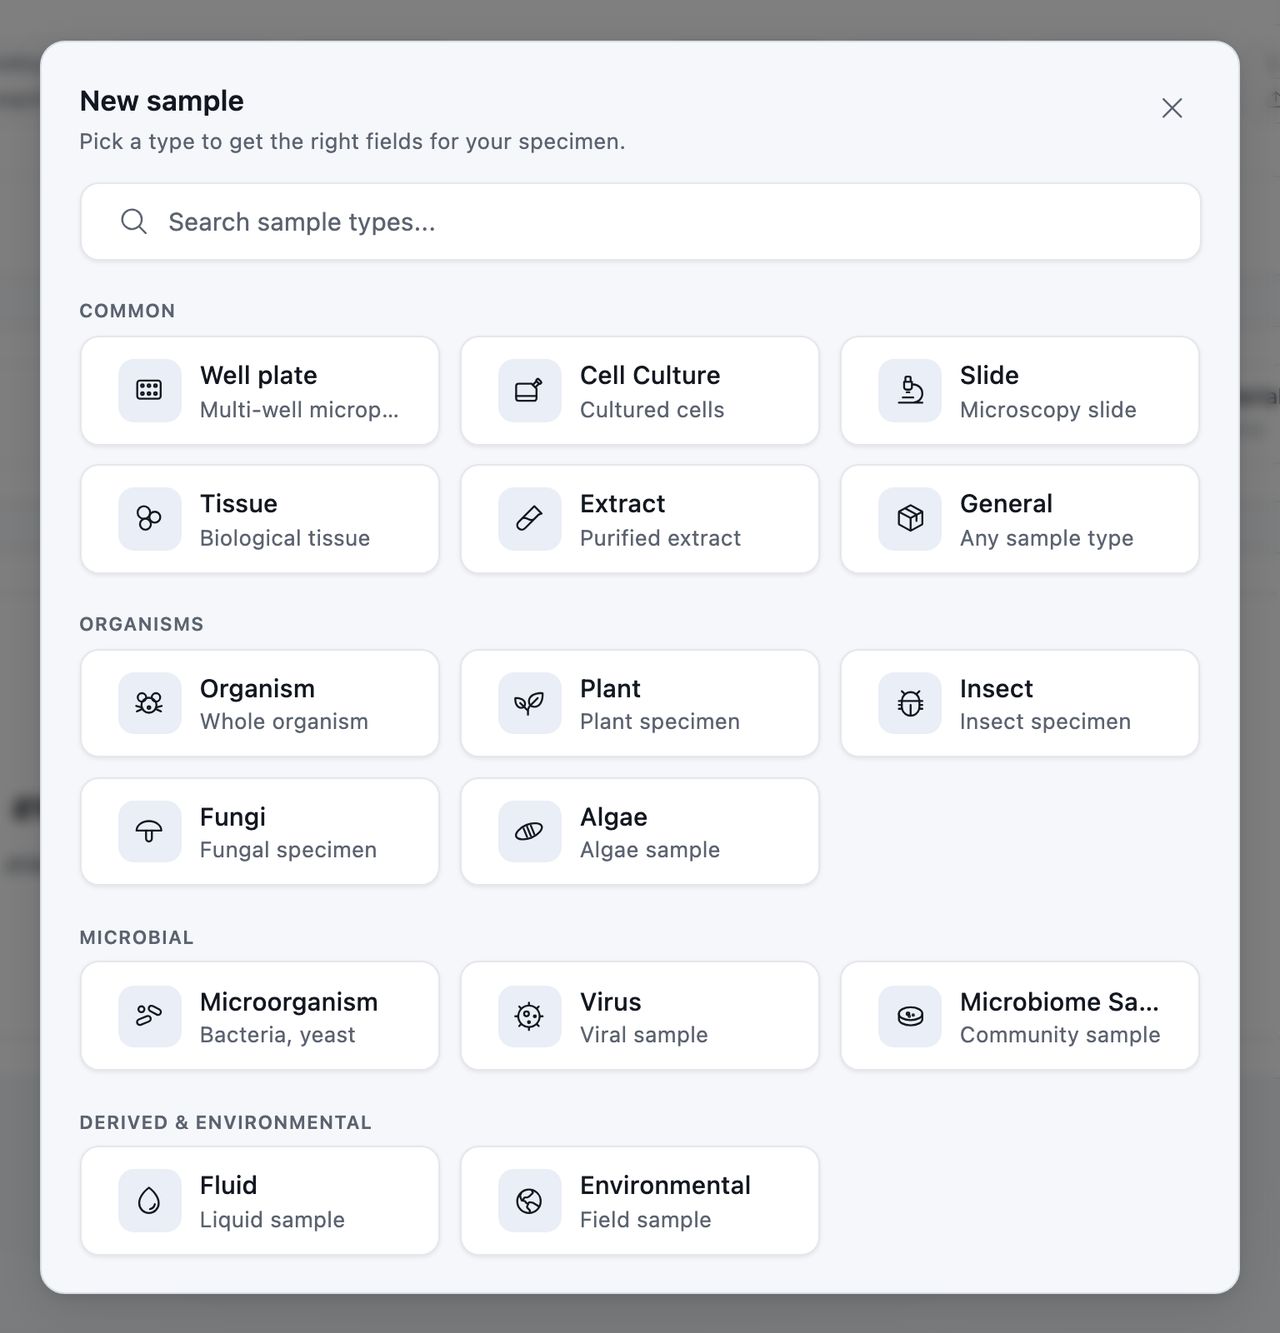
- Pick what kind of sample it is, from a grid grouped into Common, Organisms, Microbial, and Derived & Environmental.
- Give it a name, and choose whether it's private to you or shared with the project.
Everything else is filled in on the sample itself, where every field saves as you type.
Importing a Batch
Import takes a CSV or TSV. You can also drag a .csv or .tsv onto an empty workspace.
- Set a default sample type for the whole file.
- Optionally add everything you import to a group.
- Name is the only required column. External ID, description, status, collection details, species, strain, cell line, tissue type, notes, and tags are also recognized.
Column headers are matched loosely, including the names other lab tools export, so a spreadsheet from elsewhere usually maps without editing.
Sample Types
The type you pick decides what the sample can record. A cell culture wants passage number and mycoplasma status, a bacterial isolate wants a biosafety level and an antibiotic resistance profile, and a mouse wants a genotype and a treatment group.
Common
| Type | For | What it records |
|---|---|---|
| Well plate | Multi-well microplates | Opens a plate workspace. See Well plates |
| Cell Culture | Cultured cells | Passage number, media, confluence, culture type, mycoplasma status |
| Slide | Microscopy slides | Staining method, section thickness, mounting medium, tissue source |
| Tissue | Biological tissue | Organ, preservation, fixation method, disease state |
| Extract | Purified nucleic acid or protein | Extract type, concentration, A260/A280 ratio, RIN score, extraction method, volume |
| General | Any specimen | The shared fields only |
Organisms
| Type | For | What it records |
|---|---|---|
| Organism | Whole animals | Health status and score, sex, age, weight, genotype, treatment group |
| Plant | Plant specimens | Growth stage, health status and score, cultivar, growing conditions and medium |
| Insect | Insect specimens | Life stage, sex, host organism, collection method |
| Fungi | Fungal isolates | Morphology, growth medium and temperature, colony appearance, spore type, biosafety level, isolation source |
| Algae | Algal cultures | Type, growth medium, light conditions, growth temperature, culture density, isolation source |
Microbial
| Type | For | What it records |
|---|---|---|
| Microorganism | Bacteria and yeast | Biosafety level, Gram stain, colony morphology, growth medium and temperature, optimal pH, oxygen requirement, sporulation, antibiotic resistance, metabolic properties, bioactivity notes, isolation source |
| Virus | Viral stocks | Virus type, host organism, titer, storage, biosafety level, passage number, propagation method |
| Microbiome Sample | Community samples for sequencing | Host species and ID, sample site, collection timepoint, DNA extraction method, primer set, sequencing platform and run ID |
Derived & Environmental
| Type | For | What it records |
|---|---|---|
| Fluid | Blood, serum, media, any liquid | Fluid type, volume, collection method, additives and preservatives |
| Environmental | Field samples | Collection site, sample matrix, GPS coordinates, environmental conditions, depth |
Every type also carries the shared fields: name, external ID, description, tags, status, storage location, expiry, and how it was collected.
Tip: Pick the type carefully. It can't be changed later. General fits any specimen if none of the specific types do.
Why the Type Matters
| Type | What it also gets |
|---|---|
| Organism, Plant | A Health tab, with observations scored and plotted over time |
| Cell Culture | A bench log on the Activity tab, written with Log action |
| Microbiome Sample | Export QIIME2 metadata in the workspace's Export menu, producing the .tsv a QIIME2 pipeline expects from the fields you already filled in |
| Extract | A260/A280 Ratio and RIN Score beside the concentration, so you can tell whether the extract is good enough to sequence |
| Microorganism, Virus, Fungi | A biosafety level you can filter and group the whole workspace by, so you can see what BSL-2 material the lab holds and where it is |
The Health Tab
Organism and Plant samples open on it. New observation captures Health status, Health score (1–10), and photos in one step.
The tab plots the score over time and says how it has moved, such as "+2 from last week". The line appears after two readings, and the comparison once a reading is at least a week old. Observation photos are saved as sample images, so you can run image analysis across a series of them.
The Bench Log
Cell Culture samples open on Activity, where the log lives. Log action records what you did at the bench. Each action takes one or two fields, and several also update the sample:
| Action | What it writes to the sample |
|---|---|
| Split | Passage up one and confluence cleared, or p1 on a culture with no passage recorded yet |
| Thaw | Marks the sample active, and sets the passage if you entered one |
| Mycoplasma test | The mycoplasma status, on a definitive result |
| Discard | Marks it disposed |
| Feed, Observe, Freeze | Nothing beyond the entry itself |
An entry's time defaults to now. Move it back with 30 min ago, 1 h ago, This morning, Yesterday, or the date picker. Log & add another saves the entry and returns you to the picker for the next one.
An Observe entry records photos, confluence, contamination, and Appearance, all optional. Appearance offers eleven descriptions, from Normal, Clumped, and Sparse through Detaching, Floaters, and Medium cloudy, and you tap as many as apply. The photos also land on the Images tab, and a contamination flag shows red on the log for the whole team.
On the workspace, a sample's card shows its latest entry next to its passage, such as "Fed 2 days ago".
To fix an entry:
- The pencil corrects it and the trash deletes it. Either one also undoes what the entry wrote to the sample, wherever those fields still hold that value.
- You can change the entries you logged. The project lead can change anyone's.
- Every entry, correction, and deletion is kept permanently.
Entries share the Activity timeline with the sample's edits, comments, and sign-offs, ordered by when each thing happened. A backdated entry sorts under the time you did the work. Once the timeline has a few events, a filter above it splits the view into All, Bench, Changes, Comments, and Decisions, each with its own count.
The Sample Profile
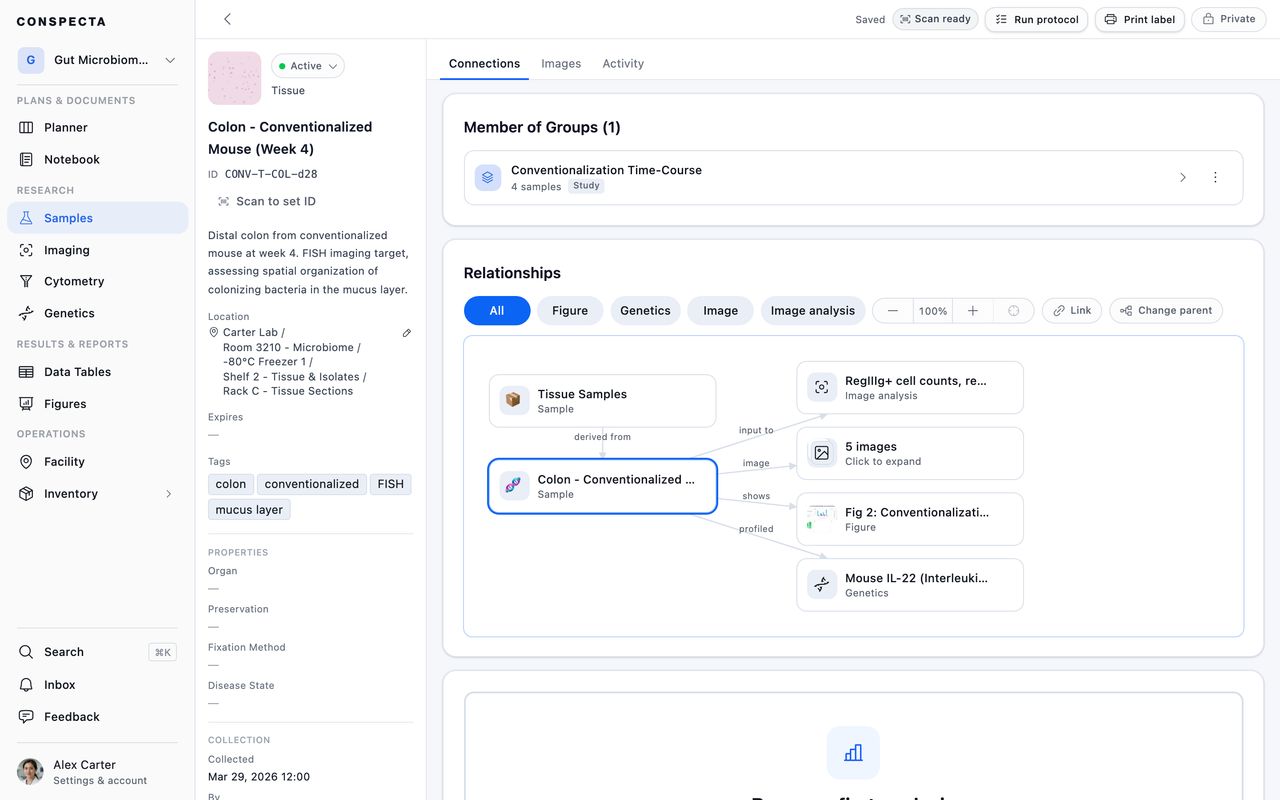
The sidebar holds the sample's identity, and all of it edits in place:
- Status, name, ID, description, Location, Expires date, and tags
- Properties, the fields specific to its type
- Collection, how and where it was collected
Location points at a shelf, box, or freezer you set up in Facility, so the record shows where the tube is stored.
Status tracks where the sample is in its life:
| Status | Meaning |
|---|---|
| Active | Stored and ready to use |
| In use | Checked out for an experiment |
| Consumed, Disposed, Lost | No longer available, because it was used up, thrown away, or lost |
| Expired | Past its date |
| Archived | Kept for the record, no longer in use |
Set it from the sidebar, or without opening the sample. Change status on a row's ⋯ and in the bulk bar takes a tray of aliquots to Disposed in one pass. A folder you tick means the samples inside it, so a folder holding none doesn't offer it.
Actions Across the Top
A Cell Culture sample leads with Log action, which opens the bench log from whichever tab you're on. The ⋮ menu beside it holds the rest:
| Action | What it does |
|---|---|
| Run protocol | Starts a protocol run against this sample |
| Print label | Produces a scannable label |
| Duplicate sample | Makes a copy of the sample and opens it |
| Share with project or Make private | Opens the sample to everyone in the project, or narrows it to its creator |
While a sample is private, the sidebar also shows a Visibility row reading Private to you, which opens the same choice. Only the sample's creator can change it, and only in a team project where there is someone to share with.
The Tabs
Most samples open on Connections. Organism and Plant samples open on Health, and Cell Culture samples on Activity. See Why the type matters above.
Connections
A graph shows where the sample came from and what came out of it, running through photos, image analysis, cytometry, data tables, figures, protocol runs, notebook pages, inventory, orders, and tasks. Below it sit the linked analysis and figures.
- Set parent sample, the dashed box above the sample on the map, records where it came from. Once it has a parent, that box is the parent itself, and Change parent sample moves to its … menu
- Link connects the sample to anything else in the project, such as an analysis, a figure, a task, or a protocol run. Pick another sample and it asks which of the two came first, so you can name a sub-sample while standing on the one it was taken from
- Image analysis starts a run from this sample's photos. Until the sample has one, the card offers Create your first analysis, or Add images if there are no photos yet. Clips stay out of an image analysis, so a sample holding only clips offers Add images too
- Flow analysis appears once the sample has at least one FCS file attached, and opens a cytometry analysis over them. Upload FCS Files and Import Gating covers attaching files
Images
Drag files anywhere onto the tab, or use Add photos. Dropping photos on the tile at the top of the sidebar does the same from any tab. Microscopy TIFFs get a preview too.
Cancel stops a photo mid-transfer. A photo that fails keeps its spot with the reason and a Retry, and a file Conspecta can't store as a photo shows the reason with Dismiss.
An .mp4 or .webm, or an animated .gif or .webp, lands in the grid as a still frame with a play badge and its running time. Click it to play it in place of the grid, as described under Video and Animations, and Images in its header returns to the grid.
- The … beside the clip's name holds Download, Download thumbnail, Rename, Set thumbnail from this frame, and Delete
- In a team project, the clip's comments fill the column beside the player
- The filmstrip under the player holds the sample's other images, and a photo there opens full size
To remove photos, tick the checkbox on one to start selecting. Select all takes every photo currently loaded and then reads Select none. Delete removes what you picked, and Cancel leaves selecting.
Activity
Every change to the record, plus its comments and sign-offs, on private and shared samples alike. @ mentions reach a colleague once the sample is shared with a project that has other people in it. On a Cell Culture sample it also holds the bench log. Follow a sample from here to be notified when it changes.
Editing a Sample Someone Else Has Open
Two people can work on the same sample at once.
If you both changed the same field, the profile shows Some fields were updated by another user. with each value under Keep mine and Use theirs. Nothing else you edit saves until you choose and click Apply.
When a save doesn't go through, the top bar reads Not saved with a Retry button.
Duplicating a Sample
Duplicate sample in a sample's ⋯ menu, or in the ⋮ menu at the top of an open sample, makes a copy beside the original and opens it. The copy is named <name> (Copy), and a second copy of the same sample becomes (Copy) (1). Duplicating needs edit access to the project.
A copy stands for a new tube:
- It keeps the type, description, tags, collection details, properties, current health status and score, notes, and photos, plus the original's folder or parent sample and its sharing.
- It starts fresh with an empty ID, no Location or box position, no Expires date, and the status Active. It belongs to you.
- It leaves behind the original's bench log, groups, and links.
Each sample's activity names the other, so the copy opens with a line naming its original, and the original gains a line naming the copy.
Expiry
Give a sample an expiry date. Once the date passes, an Active or In use sample flips to Expired automatically. Samples already marked Consumed, Disposed, Lost, or Archived are left alone.
When you save a date and a status together, the date wins over a status you set by hand. A past-due sample set back to Active stays Expired until you push the date out too.
When samples are expiring in the next 30 days or already past, a line above the list says how many. Show them narrows the list to those samples, soonest first, reaching every folder below the one you have open. Expiry appears as a label under the toolbar that you can take off.
Organizing
Grouping, Filtering, and Searching
View holds both ways of arranging the list:
- Group by reorganizes the workspace by location, species, strain, type, status, health, growth stage, life stage, biosafety level, or the month a sample was created.
- Filter narrows by those same dimensions, by whether a sample is starred or has photos, by Expiry (Expiring soon, Expired, Has a date), and by Review (Review requested, Changes requested, Approved, Rejected, No review).
Each choice appears as a label under the toolbar and comes off on its own. The search box in the toolbar matches part of a name, external ID, description, tag, species, strain, tissue type, or cell line.
A large workspace lists 500 samples at a time, with Load more at the bottom. Search and every filter cover the whole project, and each match shows the folder it sits in.
Review Status
A sample that has been signed off or sent for review says so in the list's Review column, and as a colored mark on its card:
| Review column | Card mark |
|---|---|
| Approved | Green |
| Review requested, Changes requested, Approved · edited since | Amber |
| Rejected | Red |
Hover the mark to read the status and who approved it, rejected it, or asked for changes.
Folders
Folders group samples by experiment or batch. A folder's own ⋯ holds Rename, Move to..., Star, Download, Share or Make private, and Delete.
- Download opens the export builder on that folder and everything in it, whatever folder you have open.
- Share and Make private follow what the folder holds, and appear only when every sample inside is your own.
- Delete lists every sample going with the folder before you confirm. Deleting several folders from the bulk bar does the same across all of them.
Acting on Several Samples
Select several samples for the bulk bar: Move them into a folder or another project, Share or Make private, Group them, Analyze images across all of them, Change status, Print labels, Download them as a file, or Delete.
Each row's ⋯ holds the same actions for that one sample, plus Rename, Star, and Duplicate sample.
Share and Make private appear only when everything selected is your own, since only a sample's creator can change its visibility.
Moving samples to another project takes their photos along, and the original owner stays the owner. See Moving work between projects.
Sample Groups
The Groups tab is the second way to organize samples. Folders are where a sample is filed. A group is what a sample is part of, such as a study, a cohort, a batch, or a control group. A sample can belong to several groups at once.
Making a Group
New group takes a name, a type, and whether it's private or shared.
To make one from samples you already have, tick them in the list and choose Add to Group. That files them in an existing group, or switches to New group to start one with them in it.
Working Inside a Group
Each member carries a role of Sample, Control, Calibration, or Blank, so you can tell the controls apart from the samples.
- Add samples opens your sample list with the current members already ticked, so unticking one removes it from the group.
- Run protocol runs once against the whole group, creating a single run linked to every member.
- Tick members for the bulk bar to Analyze images across them, Remove them, or set their role with Change role…. Each member's row has its own ⋯ with Analyze images and Remove.
The group's name, description, and type edit in place. If a teammate changed the same one first, their value stays on screen and a message asks you to try again.
A private group carries a Private badge on its card. Only its creator can change that, from the … menu inside the group, which offers Share with the project or Make private.
Moving, Exporting, and Deleting Groups
Select groups on the tab for the bulk bar: Rename one, Download the selection, Move it to another project, Share or Make private, or Delete. A group's row carries the same actions in its ⋯, and an open group carries Move to another project in its … menu.
Move sends the groups to another project along with the samples in them. See Moving work between projects.
- Before you confirm, the dialog box counts how many samples move, and how many groups staying behind lose a member because it's leaving inside a group you picked.
- The photos arrive in the destination and count toward that team's storage.
- Each sample loses its storage spot, the same as moving a sample on its own.
- A group holding a teammate's private sample stays in this project, and so does one with more than 250 samples.
Download opens the export dialog on the groups you ticked, and Export in the tab's header opens it on the view you're looking at or on every group. Each row carries the group's type, sample count, tags, who made it, and its dates, as CSV or Excel with the columns you choose.
Deleting a group never deletes its samples. It removes the grouping and nothing else, and the dialog box says so before you confirm.
Well Plates
Creating a Well plate sample opens a plate workspace built around a well map you lay out, prep, run, and read. It has its own page, Well plates.
Templates in the workspace header lists every plate layout the project has saved, at any plate size, and is where you rename or delete one. See Templates.
Labels and Scanning
Print label on a sample, or Print labels on a selection, produces sheets of QR labels. Choose:
- the label stock: Avery 5160, Avery 5167, Avery L7160 for A4, or an 89 × 28 mm roll
- how many copies of each
- which position on the sheet to start at, so a part-used sheet isn't wasted
Then Download PDF or print directly.
Scanning works from anywhere in the app. With a handheld scanner connected, scan a label in any workspace and Conspecta opens that sample, item, or location. Scan ready, under the workspace title beside the count, shows that a scan will be picked up. On a phone, the Scan tile does the same with the camera.
If a scanned code isn't linked to anything, you're offered Link to a sample or Link to an item. That lets you label a box of pre-barcoded tubes by scanning each tube and picking its sample. Scan to set ID on a sample profile works the other way, reading a code into that sample's external ID.
1D-only laser scanners can't read these labels. Conspecta prints QR codes, which need a phone camera or a 2D imager. On the smallest stock (Avery 5167) the code is only about 8.7 mm, which is fine for a phone or a decent imager but tight for a cheap scanner.
The label encodes only the sample's identifier, so it keeps working after the sample moves to another project.
Exporting
Export in the workspace header opens a dialog box that asks three things:
| Choice | Options |
|---|---|
| Scope | This folder only, this folder and everything inside it (the default, with a live count), or the whole workspace, always with the search, filters, and sort you have on screen |
| Columns | A checklist grouped by what the columns describe, with All and None to start from |
| Format | CSV, or Excel with an Export Info sheet naming the project, scope, filters, and when it was written |
Each sample carries its folder, type, location, and box position alongside its own fields. The column names match what Import reads, so an exported file comes back in without remapping.
Include adds a sample's attached data as extra sheets: Notes (the pages written about it), Lineage (its parent and child specimens), Images (a manifest of the pictures pinned to it), and Connections (every analysis, figure, note, and task that touches it). Anything ticked there arrives by email as an Excel workbook.
Small exports download at once. Where the list hasn't finished loading, the button reads Load the rest and export. A large export, or one with attached data, is emailed as a link, and the button reads Email me a link. Any member who can edit can start an emailed export, and a view-only member sees an explanation and can ask the owner.
Save as preset… keeps your choices under a name, so a weekly report is one click next time. Presets are stored in this browser.
Select samples and choose Download in the bulk bar to open the same dialog box on those samples.
In a project containing microbiome samples, the Export button becomes a short menu that also offers Export QIIME2 metadata. That is a .tsv of the folder you have open and everything inside it, plus your starred samples.
The whole-workspace Excel workbook lives in Settings → Export. See Share and export.