Annotate and Crop Images
Mark up an image to point at what you're talking about, such as the cell that divided, the boundary that moved, or the artifact everyone should ignore. The tools are in the Annotate panel of the image viewer, which opens from any collection in Imaging, and the same set is used wherever Conspecta hands you an image to mark up, including figure panels and exported plot trees.
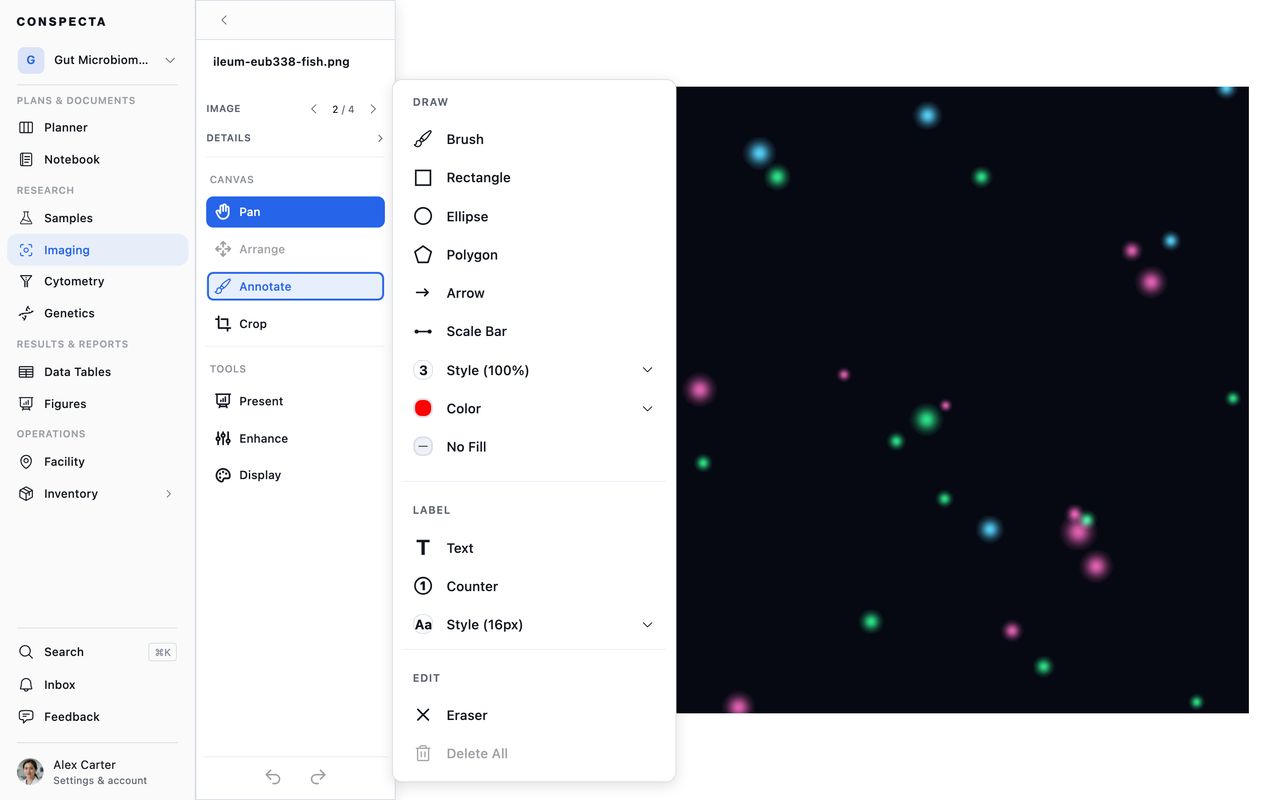
Drawing
The panel's Draw section has five shapes plus a scale bar:
- Brush for freehand strokes
- Rectangle and Ellipse, drawn by dragging from one corner to the other. Hold
Shiftfor a square or a circle,Altto draw out from the center. - Polygon, drawn either way: drag to trace it freehand and it closes when you let go, or click to place each corner and close it by clicking the first corner, double-clicking, or pressing
Enter - Arrow, for pointing at something. Hold
Shiftto keep it level, upright, or on a diagonal. - Scale Bar, for marking a distance on the image.
Shiftkeeps it level too, and its own controls are covered in Measuring with a scale bar.
An arrow's two ends are set separately. Each can be plain, standard, filled, diamond, or a circle, so a double-headed arrow across a distance and a single-headed pointer at a cell are the same tool.
Below the shapes are the styling controls that apply to whatever you draw next, or to the mark you have selected: Style for stroke width from 1 to 50 pixels and opacity, Color, and a Fill toggle with its own color and a way to clear it.
Measuring with a Scale Bar
A bar you draw has a length in pixels. Two controls under the Scale Bar tool turn that into a distance. Both work through the image's scale, so every bar you draw on it reads in the same units, and a figure built from that image carries the scale with it.
Microns per pixel is the image's scale. A series from a .lif, and a TIFF from a Thermo Fisher (FEI) scanning electron microscope, already carry the scale the microscope recorded, so bars drawn on them read in microns from the start. For any other TIFF, PNG, or JPEG, type it if you know it (from the objective, or from the acquisition software) and every bar on the image switches to physical units. Leave it empty and bars are labeled in pixels.
Bar length is the bar you have selected, and typing in it does one of two things:
| The image | Typing 50 µm into Bar length |
|---|---|
| Has no scale yet | Takes the bar as spanning 50 µm and works the image's scale out from it |
| Already has a scale | Sets the bar to exactly 50 µm |
Use the first row to calibrate from something you can measure. Draw the bar across a hemocytometer square, a stage micrometer, or a bead of known size, then type that size. Use the second to give a figure a round 100 µm bar in place of the 94.7 µm one your hand drew.
Type nm, µm, mm or px and the bar reads back in the unit that suits its size, so an electron micrograph says 500 nm and a slide scan says 2.5 mm. A number on its own keeps the unit already showing. A length in px sets the bar's pixel width and leaves the image's scale alone.
Click an existing bar with the Scale Bar tool up to select it and its length appears in the panel, ready to retype. You can also click or tap the number printed beside a bar, with any tool up but the Eraser, and type the length right there on the image. It does the same as Bar length: Enter applies it, and Esc leaves the bar as it was.
Tip: The scale is stored on the image, so the crop and screenshot rulers report the same units as the bar, and a figure panel built from that image starts out calibrated.
Labeling
The Label section adds text and numbered markers.
Text places a label you type, with its own size control running from 8 to 100 pixels.
Counter stamps a numbered marker each time you click, incrementing as it goes. Set the next number yourself or Reset to 1 to start a fresh tally.
Once placed, a label moves, resizes and rotates. Drag a corner to change its size and the handle above it to turn it. A counter badge grows from its corners and turns with the same handle.
Editing What You've Drawn
The Arrange tool selects, moves, resizes, and rotates anything already on the image. With a drawing tool active, pressing on a mark that's already there picks the mark up. The inside of an unfilled shape still counts as empty, so a smaller box can go inside a bigger one. Hold Alt to draw over a mark regardless.
Eraser removes individual annotations with one click each. Delete all clears the image, and asks first.
With a mark selected, Delete removes it, the arrow keys nudge it a pixel at a time (Shift for ten), and Escape lets it go. Single letters pick tools: H for Arrange, R rectangle, E ellipse, P polygon, A arrow, T text, B brush, C counter, X eraser. The full list is on the Keyboard Shortcuts page.
Cmd/Ctrl + Z undoes and Cmd/Ctrl + Shift + Z redoes. Undo is shared across everything you've done to the image in this session, so it walks back through annotations, enhancements, channel changes, and crops in the order you made them.
Your marks are saved against the image they're on. They come back the next time you open that image, still editable, and everyone on the project sees them. The viewer's Activity panel records the marks you draw, with how many you added or removed each time. See Imaging.
Cropping
The Crop tool draws a region to keep, with rulers along the edges so you can be precise about it.
A crop records which part of the image to show. The stored file keeps every pixel, so you can always undo a crop. Full image appears beside the Crop tool whenever there's a crop to take off, and puts the whole frame back. Undo walks back through it too, for as long as you stay on the page.
The crop is saved against the image and comes back the next time you open it, and everyone on the project sees the same region. To publish a crop, crop the image inside a figure panel, where the framing is saved as part of the figure.