Upload FCS Files and Import Gating
Put your FCS files into a dataset, link the panel they were stained with, and attach them to the samples they came from. You can also bring in gating from FlowJo or another tool, and send yours back out. Once your files are in, Analyze Flow Cytometry Data covers gating them.
Uploading FCS Files
A dataset is a group of FCS files you analyze together, such as one panel, one run, or one experiment.
Upload Files to a Dataset
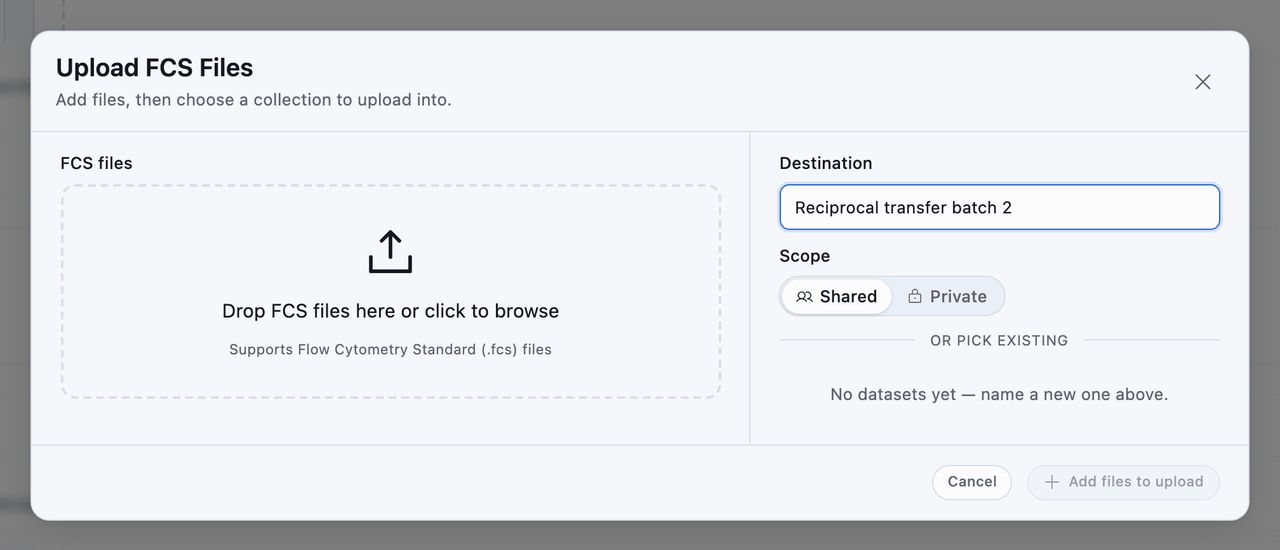
- On the FCS Datasets tab, click New dataset. Import, in the ⋯ menu to the left of New folder, opens the same dialog box.
- At the top of the dialog box, name the new dataset and choose whether it's private or shared. To add files to a dataset you already have, switch to Existing dataset and pick it. The field lists your most recent datasets, and typing searches all of them.
- Add your files.
- Click the upload button at the bottom. It shows the count, such as Upload 12 files.
You can also open a dataset and drag files onto the page. The dialog box opens with that dataset already chosen.
Each file in the list shows the event count, the number of parameters, the cytometer that wrote it, and the file size, all read from the file's header. Check them to catch the wrong tube before you upload.
- A file whose name appears twice in the list is marked Duplicate.
- A file that isn't FCS is flagged and left out. The other files still upload.
Link the Panel the Files Were Stained With
Accounts in the panel design beta see a panel band directly above the upload button. Conspecta fills it in from the dyes your files name on their channels. It shows:
- the panel's name and emission curves
- the instrument the panel was designed for
- how many markers it holds
- how many other datasets already use it
Check it's the right panel before you upload.
- To see the panel's markers, sign-off and activity, use View panel details in the band's ⋯ menu.
- To pick a different panel or link none, use Change panel… or Remove panel in the band's ⋯ menu.
- If no panel matched your files, the band shows Choose a panel instead.
- If you're adding files to a dataset that's already linked to a panel, the band names that panel and the files join it.
- If the files were acquired while an older version of the panel was in use, the band offers to link them to that version.
Track Panel Versions Across Runs covers how the panel is chosen and how to change it.
When you open a dataset linked to a panel, a band under the dataset's name shows the panel's emission curves and a tag for each marker with its dye. Use it as the legend for the files below. Click the panel's name on the band for Open panel, Change panel…, and Remove panel. When the panel is bound to one of your lab's instruments, click the instrument's name on the band to open its page in Facility.
The band also shows whether the panel still matches the tubes. If a dye has moved since the tubes were run, it reads Edited since followed by the version linked to these tubes, with a What moved link. Know Which Version a Run Used covers what counts as a change.
Supported FCS Versions
- FCS 3.0, 3.1, and 3.2 are supported, the versions current cytometers write.
- FCS 2.0 files open too, but some of their encodings from the 1990s can be misread. Re-export from your acquisition software if you can.
- Files that store their data as ASCII text aren't supported.
Work with the Files in a Dataset
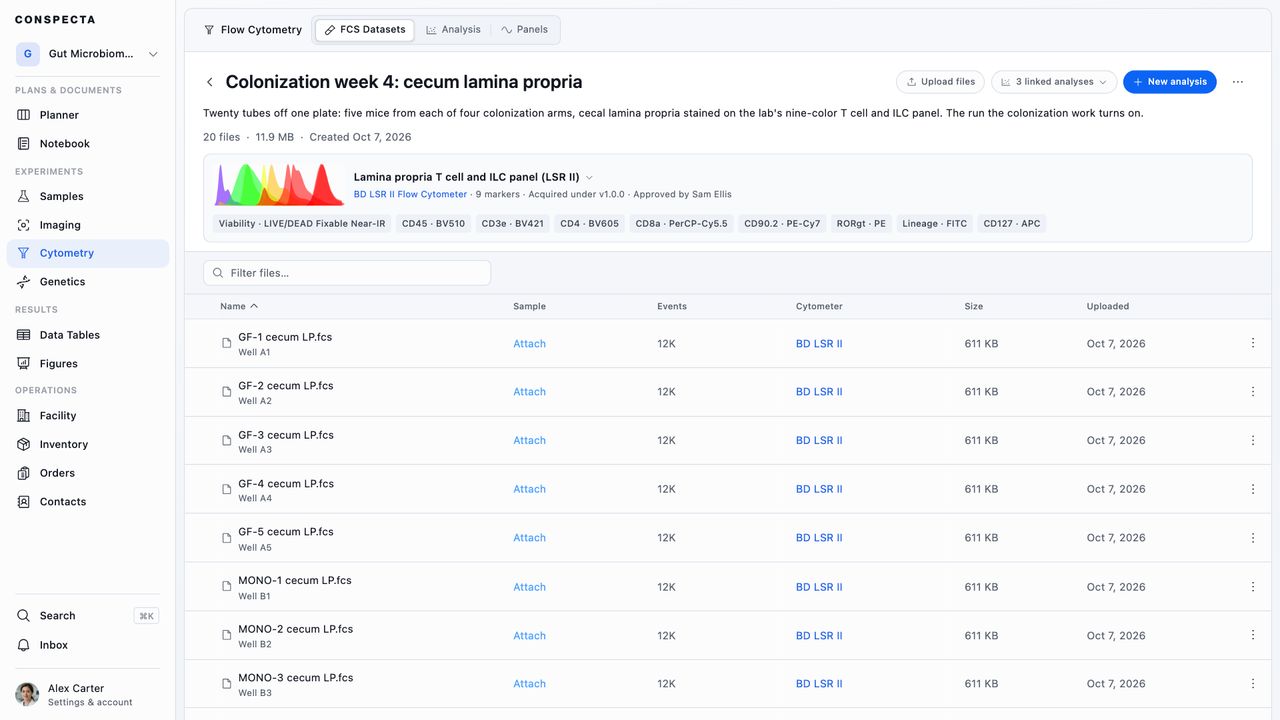
Open a dataset to see its files in a table, with the name, sample, event count, cytometer, size, and upload date. Under each name are the tube, well, and tube label from the file's own keywords. Anything Conspecta couldn't read from a file is flagged. When a file's cytometer is one of your lab's instruments in Facility, the cytometer links to that machine's page.
Tick files to act on them. You can:
- start an analysis that uses only the ticked files
- attach them to a sample
- download the original files. One file downloads on its own. Several download as a ZIP, and a notice shows the progress and tells you when it's done.
- move them to another dataset
- remove them
- rename it, with one file ticked, by clicking Rename. The new name applies across the project, so every analysis that uses the file shows it.
Each file's row has a ⋯ with the same actions for that file alone.
Click the dataset's name to rename it. To record what the run is, such as the panel, the harvest day, or the condition, click Add a description… under the name. Press Enter to save either one.
Attach Files to Samples
The Sample column names the specimen each file came from. Click a name to open that sample. A file with no sample shows Attach instead of a name. Click the column header twice to sort those files to the top. A file pooled from several specimens shows the first one and a count of the rest.
To change the samples for one file:
- Click Attach, or Change if the file already has a sample. The picker lists its current samples under Selected.
- Tick a sample to add it, or untick one to detach the file from it.
- Click Save. If nothing is ticked, the file is detached from every sample.
To attach several files at once, tick them and click Attach to sample in the toolbar. This only adds samples. If every file you ticked has the same tube label and exactly one sample matches it, that sample is marked Suggested in the picker, with the tube label beside it. You still choose, because the tube label is whatever someone typed at the cytometer.
Attached files appear on the sample's Connections tab, and Flow analysis on the sample opens a cytometry analysis with those files.
Manage a Dataset
In an open dataset, the ⋯ beside New analysis acts on the whole dataset:
- Download files downloads every file in the dataset.
- Star keeps the dataset at the top of the grid.
- Rename opens the dataset's name for editing.
- Move and Delete dataset do the same as when you tick the dataset in the grid.
- Share with the project and Make private appear for the person who created the dataset.
A member with view-only access can still download and star.
In the list, each dataset and analysis row has its own ⋯ menu with Rename, Move to..., Star, Download, Share or Make private, and Delete.
Deleting a dataset moves it to Trash, where you can restore it for 30 days.
Bringing Gating In
You can import the gating from a FlowJo 10 workspace (.wsp) or a Gating-ML 2.0 file (.xml or .gml), the format FlowJo, Cytobank, and the R CytoML package write. Import it into a dataset to check it against your own files before you keep it.
Open a Gating File on a Dataset
- Open the dataset that holds your FCS files.
- Click the ⋮ menu at the top right and choose Import gating.
- Pick the gating file.
Conspecta reads the file in your browser, and the file stays on your computer. Nothing changes in your project until you save. For a FlowJo workspace you see:
- each sample in the file, with its gating hierarchy
- the counts FlowJo recorded. Until you run the check, every count on screen is FlowJo's.
- whether the sample's FCS file is already in this dataset
A gate Conspecta can't rebuild is listed on its own row with the reason. For a FlowJo workspace, Conspecta rebuilds the gating when you run the check, so some of these appear only then.
A workspace from FlowJo 9 or earlier uses a different format and won't open. A message tells you so. A Gating-ML 1.5 file is refused the same way. Export it again as Gating-ML 2.0 and try again.
Checking a Workspace Against Your Data
Click Check against my data to test a FlowJo workspace on your files. The button appears when at least one sample's FCS file is in this dataset. Conspecta rebuilds the gating, runs it on the files in this dataset, and shows its own count beside FlowJo's for every population. Each row then reads one of these:
- Matches when the two counts agree
- Differs when they don't, with both numbers shown
- Not imported when Conspecta couldn't rebuild the gate. It never counts as a match.
- Not checked when the population couldn't be checked
Expect most populations to match within a fraction of a percent, and some to differ. Ellipse gates are rebuilt exactly as the file states them, but FlowJo's count can still be a fraction of a percent off. FlowJo counts events through a slightly larger, screen-resolution copy of its own ellipse.
If the workspace has a compensation matrix and its gates are drawn on compensated channels (FlowJo names these Comp-), the check applies the matrix to your events first, so both counts use the same corrected values. If the gating mixes compensated and uncompensated gates on the same corrected channel, it's counted on compensated values, and the rows for the uncompensated gates say why they were skipped.
If the workspace did its own spectral unmixing, its gates sit on marker values FlowJo calculated and never stored in the file. Conspecta refuses those gates. The message asks you to export the unmixed files from your acquisition software and import those, because files unmixed at acquisition have one column per marker.
If a file won't load during the check, it's reported and skipped, and the check carries on with the rest.
A Gating-ML file has gates, axis scales, and a compensation matrix, but no samples and no counts, so there's nothing to check. Conspecta rebuilds its gating as soon as it reads the file, and each refused gate shows its reason before you decide to keep it.
Save the Imported Gating
Click Save as gating strategy to keep the populations that came across. Each sample becomes a gating template in this project. The template holds the gates, the plots they sit on, the compensation matrix if the file had one, and a note of the file it came from. You apply it to a flow analysis like any other template.
- For a FlowJo workspace, the button appears after you run the check, so you see the numbers first.
- For a Gating-ML file, the button appears as soon as the gating is rebuilt.
Populations that couldn't be rebuilt are left out of the template, and its description says how many.
Other Ways to Import Gating
You can also import a gating file straight into your templates. This import saves each sample in the file as its own template, with no check against your data. Open it any of these ways:
- Drag the file onto the FCS Datasets or Analysis tab of the Flow Cytometry page.
- Pick it in the upload dialog box, from New dataset or Import on the FCS Datasets tab.
- Click Templates on the Analysis tab, then drag the file onto the list or click Import gating.
- Drag it onto an open analysis that has a file loaded, if you have edit access.
Flow Files and Templates covers that import and what carries over.
If you pick or drop FCS files together with a gating file:
- In the upload dialog box, the gating file opens the import.
- On the Flow Cytometry page, a
.wspfile always opens the import. A Gating-ML file opens it only when you drop it on its own. Dropped with FCS files, it's set aside and named on screen, so a stray.xmldoesn't turn a batch of tubes into an import. - On an open analysis, only the gating file is imported. The FCS files are named on screen and not added. Add them with Manage files.
When the import opens from the Flow Cytometry page or the upload dialog box, the FCS files wait, staged for upload, until you close it.
Export Gating to FlowJo and Other Tools
You can export gating in two formats:
- Gating-ML writes an
.xmlfile in the ISAC Gating-ML 2.0 standard. FlowJo, Cytobank, and the RCytoMLandflowWorkspacepackages read it. It holds gating only. Plots, layouts, colors, and notes aren't included. - FlowJo .wsp writes a FlowJo 10 workspace, which FlowJo opens directly.
| What to export | Where |
|---|---|
| One template | Open it and choose Export as Gating-ML or Export as FlowJo .wsp from its ⋮ menu |
| The samples in a FlowJo workspace import | Export as Gating-ML on the import screen, after the check. Each rebuilt sample becomes its own file |
| The analysis you pick | Export on the Analysis tab. Choose the gating strategy of each analysis, or The gating templates behind them, in either format |
| Every strategy in the project | Settings → Export. Choose Gating-ML (.zip) on the Gating Templates or Flow Analysis row |
When the gating has a compensation matrix, both formats write it into the file, and gates on corrected channels refer to it. The other tool then draws them on the same compensated values. In a .wsp file those channels use FlowJo's Comp- names.
A .wsp file holds one sample with your gating tree. When you open it, FlowJo asks where the data files are. That's normal for a workspace whose files aren't beside it. Quadrant gates are written the way FlowJo writes them, as four corner populations. These can't be written to a .wsp file:
- a Boolean gate that uses the NOT toggle on one of its populations. Rebuild it with a separate NOT population first.
- a NOT population with more than one population in it
- a Boolean gate that combines a whole quadrant gate. FlowJo can combine only one of its corners.
- a Boolean gate that combines a population with
/in its name - two shape gates on the same channel that use different axis scales, because a workspace stores one scale per channel
In both formats, a gate that can't be written exactly is left out, and the export lists it on screen with the reason. These are left out too:
- a gate whose plot has been deleted, because the plot records the scale the gate's shape was drawn in
- a gate under a gate that was left out, or one that combines it, because a file that refers to a missing gate won't open cleanly in another tool
What Each Format Imports
A gate that can't be imported exactly is refused, with the reason on screen.
| What | From a FlowJo workspace | From a Gating-ML file |
|---|---|---|
| Rectangle, range, and polygon gates | Imported | Imported |
| Quadrant gates | Imported (FlowJo writes the four corners as rectangle gates) | Imported |
| Ellipse gates | Imported | Imported when stated in data units |
| Boolean gates, including complemented operands | Imported | Imported |
| Axis scales | Linear, log, biexponential, logicle, and arcsinh | Linear, log, logicle, and arcsinh. Hyperlog works for straight-edged gates |
| Compensation matrix | Saved onto the template. Gates spelled Comp- land on the channels it corrects | Saved onto the template. Gates that read through the matrix land on the channels it corrects |
| Spectral unmixing done inside the workspace | Refused. Import the unmixed files from your acquisition software | Refused, with the same guidance |
| Gates on computed ratio parameters | Refused with the parameter named | Refused with the parameter named |
| Plots, layouts, and colors | Not carried over | Not part of the format |