Map Lab Storage and Book Instruments
Facility is the lab's physical plant: the rooms, the freezers, the shelves and boxes inside them, and the instruments people book time on. Set it up once and every sample and every reagent can point at its place in the lab, so you can look up where anything is.
Facility belongs to the team, so every project in the lab stores things in the same freezers. You'll find it under Operations in the sidebar, and it opens without picking a project first.
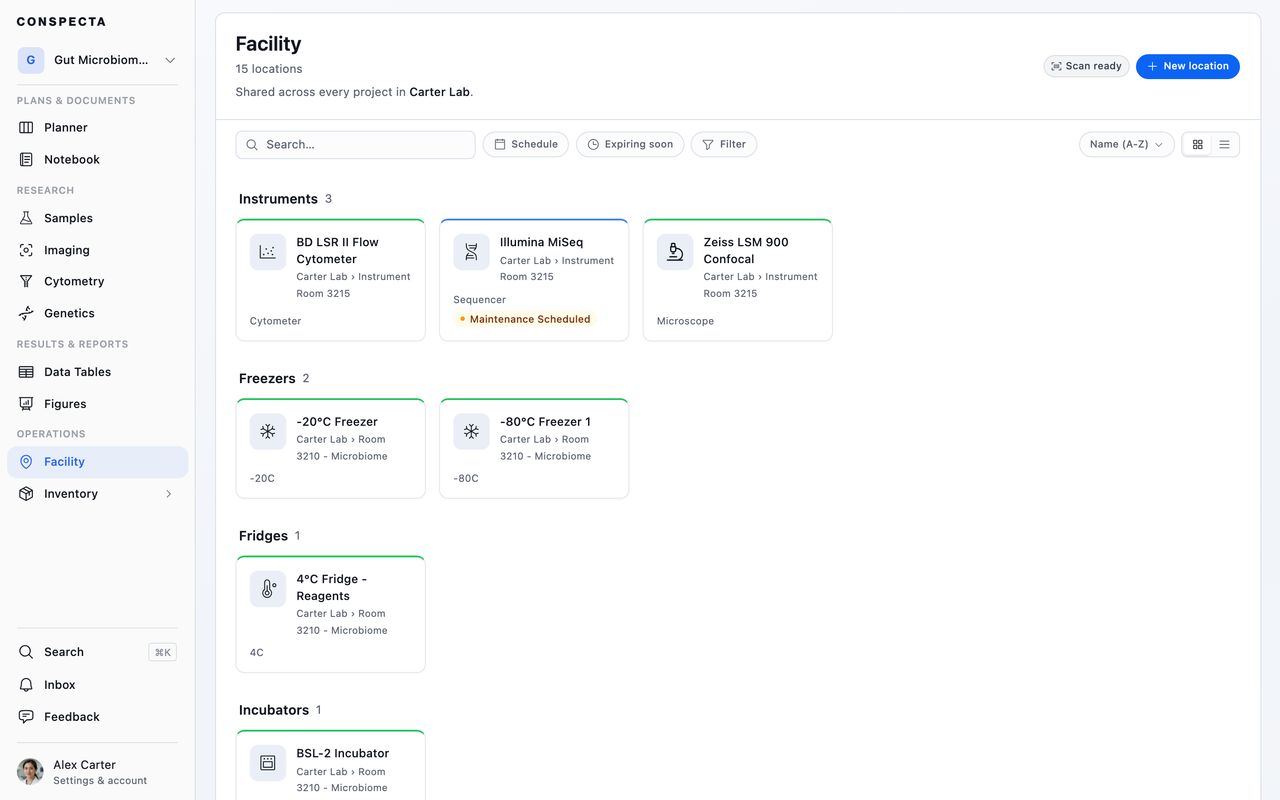
Creating a Location
New location lists the location types, grouped by what they are:
| Group | Type | What it's for |
|---|---|---|
| Instruments & equipment | Instrument | A bookable machine like a microscope or plate reader |
| Freezer | Frozen storage, −20°C to −80°C | |
| Fridge | Refrigerated storage, around 4°C | |
| Incubator | Temperature-controlled incubator | |
| Cryo tank | A liquid nitrogen dewar, around −196°C | |
| Spaces | Site | A campus or address the lab's buildings sit on |
| Building | A whole building or facility | |
| Floor | A floor within a building | |
| Room | A room or lab space | |
| Cold room | A walk-in refrigerated or freezer room | |
| Storage & other | Cabinet | A storage cabinet with shelves or drawers inside |
| Shelf | A shelf inside a fridge, freezer, incubator, or cabinet | |
| Drawer | A drawer inside a cabinet or appliance | |
| Box | A storage box placed on a shelf or inside a drawer | |
| Other | A custom location that doesn't fit the presets | |
| Agriculture | Greenhouse | A greenhouse or covered growing space |
| Field | An outdoor growing field |
Pick one and you're asked for a name plus whatever that type needs. A freezer, cryo tank or cold room asks its temperature, an incubator or greenhouse asks temperature, CO₂, and humidity, and an instrument asks what kind it is. Anything that holds things also asks how you want to track them:
- Shelves only adds named shelves and assigns samples and materials to them. Right for most labs.
- Shelves + boxes with position grids adds boxes with numbered grids on top, so you track exactly which position a sample sits in. Worth the extra structure for a biobank or a shared core facility.
Parent location, description, and picture are set afterwards on the profile. The type is the one thing you can't change later, because the fields a location has depend on its type.
Clicking the picture at the top of the sidebar opens Choose Location Image, and dragging an image onto it goes straight to Adjust Location Image, where you pan, zoom, straighten, and rotate to choose the part that shows.
Once there is a picture, clicking it offers View, Change, and Remove, and View shows the whole image.
The picture belongs to your team, like the location, so it shows in every project your team runs and when Facility opens with no project picked. A location another lab shares with you shows that lab's picture, and only that lab can change it.
Tip: Shelves and drawers aren't in the New location list. You add them from inside their parent, on its Contents tab.
Locations nest the way the physical world does: buildings on a site, rooms in buildings, equipment in rooms, shelves and drawers in equipment, boxes on shelves. You can only nest a location where it would physically fit, so a building can't go inside a freezer.
Cambridge                        (site)
  └─ Biology Department          (building)
       └─ Room 204               (room)
            ├─ Freezer −80°C     (freezer)
            │    ├─ Shelf 1      (shelf)
            │    │    └─ Sample Box A1   (box)
            │    └─ Shelf 2
            ├─ Fridge 4°C        (fridge)
            ├─ Confocal A        (instrument)
            └─ Chemical Cabinet  (cabinet)
The landing page lists every location as cards or rows, each with its path shown underneath, grouped by type or by category. Click a group's heading to fold it away. View on the toolbar switches between cards and rows, alongside the sorting and filtering.
In rows, each group shows the readings that matter for what's in it, such as temperature and sample count for freezers, or model and last service for instruments. A group gets a Status column only when something in it needs attention, such as an instrument that is broken or has maintenance scheduled.
A site, building, field or greenhouse also shows its street address under its name.
You walk the hierarchy by opening a location and looking at its Contents.
Moving a Location
Hover a card to tick its checkbox, pick as many as you need, and choose Move. The facility tree opens and you pick where they go. Only the places that can hold what you picked are selectable, so a box offers you shelves and appliances, and a freezer offers you rooms.
Everything inside travels with it. A freezer carries its shelves and the boxes on them, and the samples in those boxes keep their positions.
Shelves and drawers move from the parent they sit in, since they have no page of their own. Open the appliance or cabinet, go to Contents, and choose Move shelf from the shelf's own menu.
You can also change one location's place from its profile, in the Parent field on the Details tab.
Importing a List of Locations
A lab that already keeps its freezers and boxes in a spreadsheet can bring the whole list in at once. Import, under the ⋯ in the header, takes a .csv or .tsv, and you can drop one onto the workspace instead.
Conspecta reads the header row and shows the field it matched each column to, so you can correct any match before locations are created. A Default location type covers rows without a Type column, so a sheet of freezer names becomes freezers in one pass. Rows it can't read are listed with the reason and skipped, leaving the rest to import.
Everything arrives as a flat list, whatever the sheet implied about nesting. Select the imported locations afterwards and use Move to file them where they belong, or set one location's Parent on its profile.
Filling a Location
A location's Contents tab is where things go in.
With shelves only, you get a list of shelves. Add one, rename it, and use + Add item to put something on it. Anything within 30 days of its expiry date carries Expires in 5 days beside its name, turning red and reading Expired once the date passes, so you can read a shelf without opening the records on it.
With shelves and boxes, each shelf shows its boxes, and opening one gives you the box map.
The Box Map
The map is a grid of the box's cells, laid out the way the box is. Click an empty cell to place something in it, and drag between cells to move a tube or swap two. Each cell shows what's in it, so you can read a freezer box without opening it.
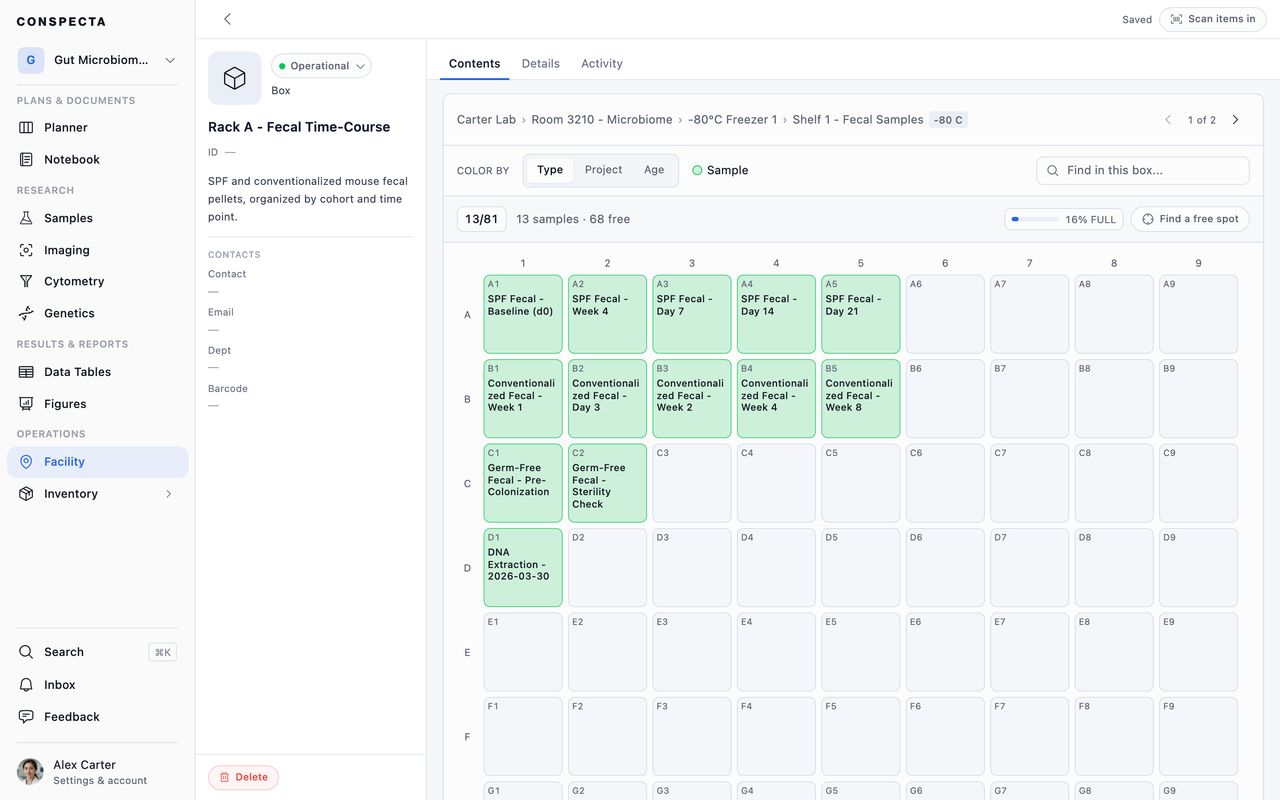
A freezer belongs to the lab, so a box can hold work from several projects at once. Cells filled by a project you're not on read as Taken by another project and show no name or owner, because that material isn't yours to see. They can't be clicked, moved, or placed into, and they don't turn up in a search of the box. The count above the grid names them separately, so what's yours, what another project holds, and what's free add up to the size of the box.
| Color by | Shows |
|---|---|
| Type | Samples against inventory items. The default, and the one that needs no other data |
| Project | Whose material this is |
| Age | How long each thing has been sitting there, from fresh through to suspect |
Age bands use spans such as "< 3 mo", "3 mo to 1 yr", and "> 2 yr", and each cell can show its own age. The legend lists only the projects and age bands in the box you're viewing.
Find in this box highlights matches as you type and shows how many it found.
Anything assigned to the box but not yet given a cell sits in a list below the grid, with a button to place one or to fill the free cells all at once.
Scan items in on a location's header starts a session, and every code you scan is placed into that location, taking the next free cell in a box. The banner counts as you go, stays up when you switch tabs, and stops when you press Done. On a phone, and in the app on any screen, a session opens the camera and holds it open so a rack goes in tube after tube. Close the camera and Scan on the banner brings it back.
You can still assign a location from a sample or an item's own profile. Both directions stay in sync.
Location Details
A location's Details tab carries what its type needs: the location that holds it, whether it's bookable, its capacity, and its temperature and storage conditions. Where they apply, it also holds asset details (tag, serial, manufacturer, model), environmental monitoring, compliance and safety, growing conditions, and booking rules.
An instrument keeps all of that on two cards. Instrument holds where it lives and what it is, and Booking holds whether it can be booked and the rules that apply once it is.
A location's status is Operational, Maintenance Required, Broken, or Decommissioned. Maintenance Scheduled shows while downtime sits on the calendar, and clears when the block passes. Choosing it from the status menu opens the downtime scheduler instead of setting a status by hand.
Recording a Cytometer's Lasers and Filters
A flow cytometer also gets an Optical configuration card listing each laser and its detectors. An empty card offers three ways to fill it:
| Start from | How |
|---|---|
| The maker's published setup | When Conspecta recognizes the model, Use the <model> setup fills it in one click. Otherwise Choose a base setup lists every machine whose maker publishes one, searchable by maker or model |
| An FCS file | Choose an FCS file lists the cytometry files in this project, this machine's first, with From my computer for a run that was never uploaded. You can also drag a file onto the card. Only the file's header is read, and a file from your computer stays on your computer |
| Nothing | Enter it by hand opens the editor empty |
The editor takes one row per laser, with its wavelength and a name. For each laser, enter either the filters in front of its detectors or the span a detector array covers:
- Write filters the way they are printed on the part, separated by commas, so a blue laser reads
530/30, 695/40, 685 LP. - A spectral bank takes the number of detectors and the two wavelengths it runs between.
- Saving is refused for a laser with no detectors, a range that runs backwards, or a wavelength outside 300 to 900 nm.
Once a configuration is recorded, Edit on the card opens the editor on it, so you can correct the few filters your facility swapped. Its Fill it in from row offers A maker's setup and An FCS file, and Remove configuration is there too.
A maker's setup carries a note that installations vary. Once you edit it, the card credits your lab, shows the date you recorded it, and drops the note.
Confirming the Setup Against the Machine
The foot of the card says how far the setup has been checked:
| Foot of the card | Means |
|---|---|
| Base setup, not confirmed | A maker's published setup nobody here has compared with the bench |
| Recorded by this lab | Your lab entered or edited it |
| Confirmed, with a date and a name | Someone checked the lasers and filters against the machine |
Once you've checked the machine, Confirm this setup marks it confirmed, and the instrument's Activity tab records "Confirmed the optical configuration". Anyone who can edit the lab's instruments can confirm.
Editing a confirmed setup sets it back to unconfirmed, and the activity entry for the edit says the confirmation was cleared. When you pick a confirmed machine for a panel in Cytometry, a small seal beside its name shows who confirmed it and when.
Measured Dyes on a Cytometer
The last line of the card is Measured dyes, with how many dyes and lots the lab has read on that machine. View all lists each dye once, and clicking a dye shows the lots it was read from and the date of each reading. Search by dye name or lot number, so "BV" finds every Brilliant Violet dye and a lot number finds the vial in your hand.
The readings come from single-stain control files. They belong to the machine rather than to any one project, so a cytometer a core facility shares with you brings its measured dyes along.
Upload controls on the line opens the reference controls right here, set to this machine. Drop the files, check that each one reads Good, and save. The line counts the new dyes as soon as the save lands. The button appears when panel design is on for your account and you opened Facility from inside a project that belongs to the lab running the machine.
Editing a Location Someone Else Has Open
Two people can edit the same freezer at once. If you both changed the same field, the location shows both values with Keep mine and Use theirs, and Apply saves the one you pick. A save that doesn't go through reads Not saved in the top bar, with Retry, and leaving the page while a change is unsaved asks first.
Book Time on an Instrument
Bookable locations get a Schedule tab. Instruments have one from the start, and any location can be made bookable from its Details tab, an instrument from its Booking card. An instrument opens on its Schedule tab, except a new one, which opens on Details first so you can record its make, model, and booking rules before anyone reserves time.
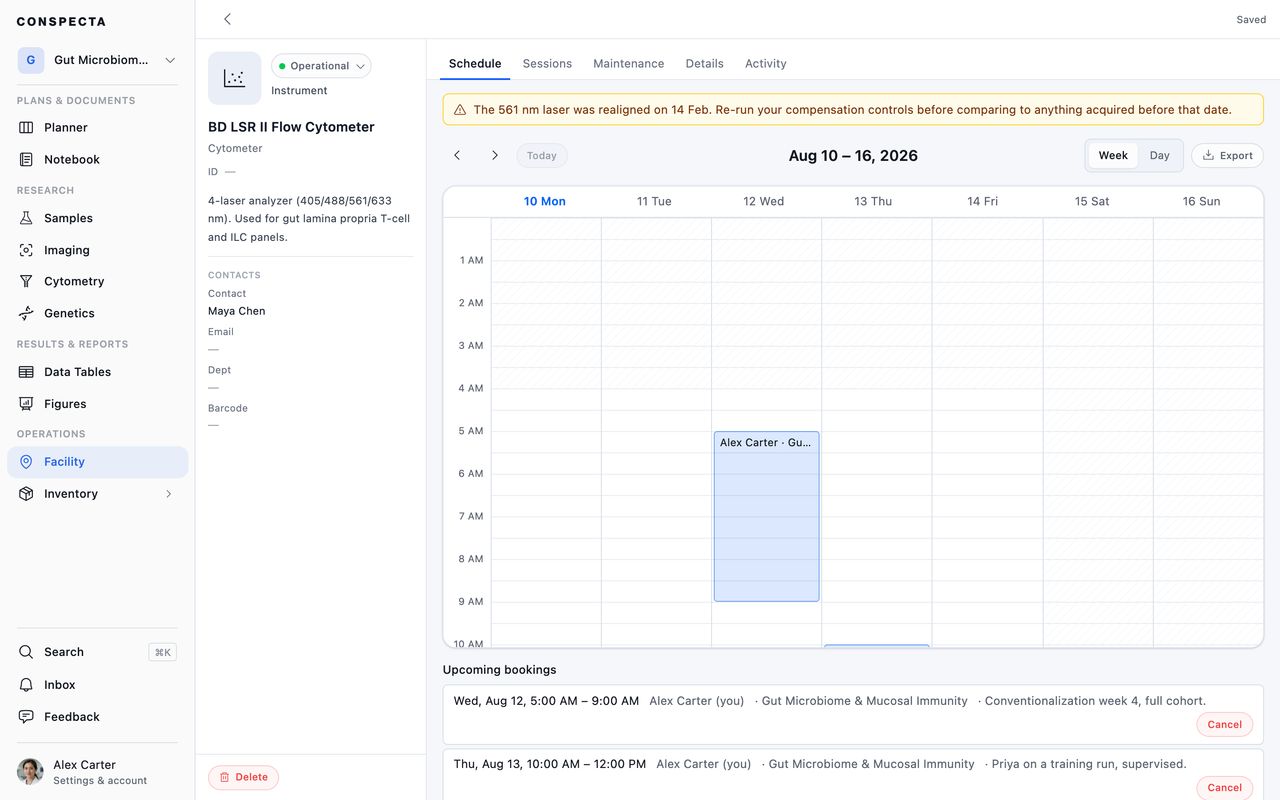
The schedule is a grid of the location's reservations, a week at a time on desktop and a day at a time on a phone:
- Click a free slot to book it. Pick which project the session is for, which is what links the booking to the work it produces, and add a short note. If the team has no projects yet, name one right in the booking form and it's created with the booking.
- Each slot takes one booking. If someone takes the slot between your click and your confirm, you'll be told the time is already booked and can pick another. Back-to-back bookings are allowed, so a session ending at 11:00 and one starting at 11:00 don't collide.
- Cancel from the Upcoming list below the grid, which frees the slot immediately. You can cancel your own bookings there, and team admins can cancel anyone's by opening the booking itself. An admin can also Release slot on a session that has already started but isn't being used.
You'll get a reminder in your Inbox about 30 minutes before each session. If the lab schedules downtime over your booking, the booking is canceled and the notification tells you which instrument, when, and why.
The Booking card on the Details tab sets the rules for a shared instrument: slot size, shortest and longest booking, gaps between bookings, how far ahead people can book, notice required, how far back a past session can be logged, a cancellation cutoff, a weekly cap per person, plus operating hours and closures. Everyone can read the rules, and team owners and admins can change them.
The facility landing's Schedule tab shows every bookable instrument side by side for one day, so you can see what's free now. Switch to Week to plan ahead: each instrument gets a row and each day a bar of its bookings, with downtime hatched and the hours booked underneath. Click a day in the week to open it, or click an instrument's name to open its own schedule. Filter either view by instrument kind.
On any schedule, click the date between the arrows to pick a day from a calendar. When you open an instrument from the facility schedule and go back, you land on the same view and date.
Anyone on the team can see the schedule. Booking needs a team role above viewer. Export calendar downloads your own recent and upcoming sessions as an .ics file for Google Calendar or Outlook.
Downtime and Notices
Schedule downtime takes an instrument out of service for maintenance, a repair, a calibration, or because it's reserved. Bookings inside the window are canceled and the people who held them are told.
Canceling a downtime block does not restore the bookings it canceled. The dialog box says so before you commit, and tells you afterwards how many bookings were canceled. If you take a block off the calendar, tell the people who lost their slots.
Each block in Scheduled downtime has a ⋯ menu with Edit reason and Cancel downtime. The window itself stays fixed, so to move one, cancel it and schedule a new block.
Sometimes a machine is usable but people should know something, like a flaky laser or a noisy stage motor. Admins can Post notice from the Schedule tab, optionally marking it as a caution that results may be affected.
It shows as a banner on the instrument, in the booking form, and as a caution marker after the instrument's name in the facility-wide day view. Hover the marker, or tap it on a phone, to read the notice there. Each banner shows who posted the notice and when it ends.
Everyone with an upcoming booking is notified, and notices expire on their own after 30 days.
Each notice in the admin's Notices list has a ⋯ menu:
| Action | What it does |
|---|---|
| Edit notice | Changes the wording or the caution mark. The notice reads Edited, and Activity keeps the earlier wording. Turning a notice into a caution notifies everyone with an upcoming booking, and a wording change notifies no one. |
| Extend | Keeps the notice up 7, 30, or 90 more days, as far as a year from today. |
| View in Activity | Opens the instrument's Activity tab. |
| Take down | Removes the notice once you confirm. |
An instrument marked Maintenance Required can still be booked. Booking it asks you to acknowledge that results may be affected, and the booking goes through.
Booking a session that runs before scheduled maintenance or a repair asks for the same acknowledgment, and names the maintenance or repair window. Sessions after the window, and sessions before a calibration or a reserved block, book without the acknowledgment.
Service History
Bookable equipment gets a Maintenance tab, the service log for that machine. Each entry records the kind of work (preventive, repair, calibration, or upgrade), when it was done, who did it (often a vendor technician, so it's free text), what was done, and what it cost. Anyone can read the log, and admins add to it.
Each entry's ⋯ menu offers Edit entry, Log again (a copy dated today, for recurring work), and Delete entry. Activity keeps the values an edit replaced.
Set a service interval on the Details tab to give the machine a due date. Logging a completed service moves it forward, and editing or deleting an entry recalculates it from the latest work left in the log. The tab shows an amber banner once the machine is overdue, and the team's admins are notified.
QC Runs on a Cytometer
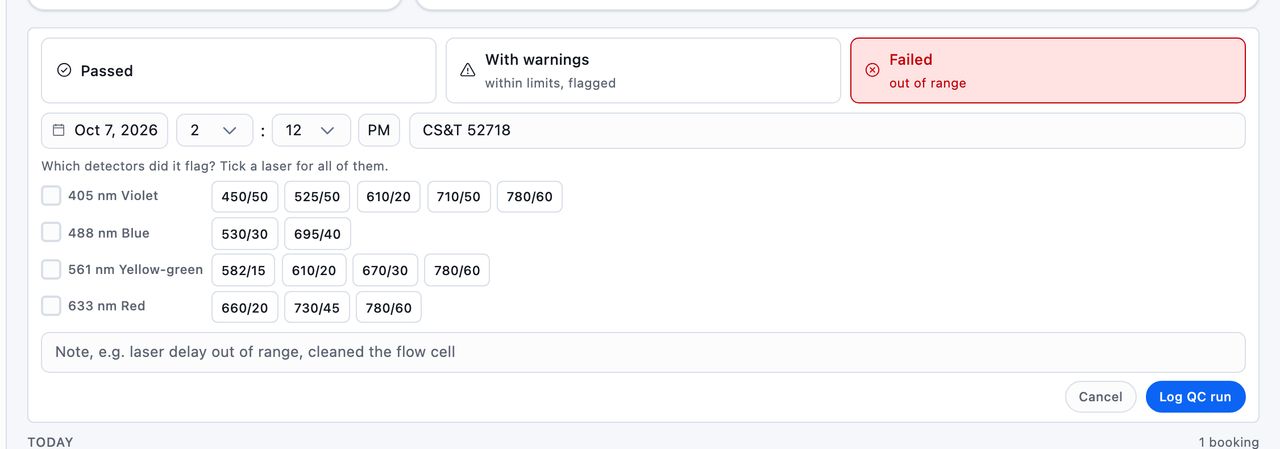
A cytometer's Maintenance tab also holds its QC runs, the bead check you do before people use the machine. Anyone on the owning team who can book it can Log QC run. A run records when it ran, the bead lot (carried over from the last run), the result and a note. The result is Passed, With warnings (within limits but flagged), or Failed (out of range).
For a warning or a failure, mark which detectors it flagged. They come from the lasers and detectors recorded on the Details tab, and ticking a laser flags all of its detectors. QC runs never move the service due date, so keep logging calibrations and repairs in the service log.
Above the list, the month is laid out Monday to Sunday with a mark for each run that day, worst first. A dashed red mark is a past day someone had the machine booked and nobody logged QC. Pick a marked day to jump to it in the list, and use the arrows to page back through the past year.
Beside the month:
- The month's counts of failed runs, warnings, and booked days with no QC. Pick one to list only those runs.
- Detectors flagged, last 90 days, which groups flagged detectors by laser with how many failed and warning runs named each and when it last happened. Pick a laser to list its runs.
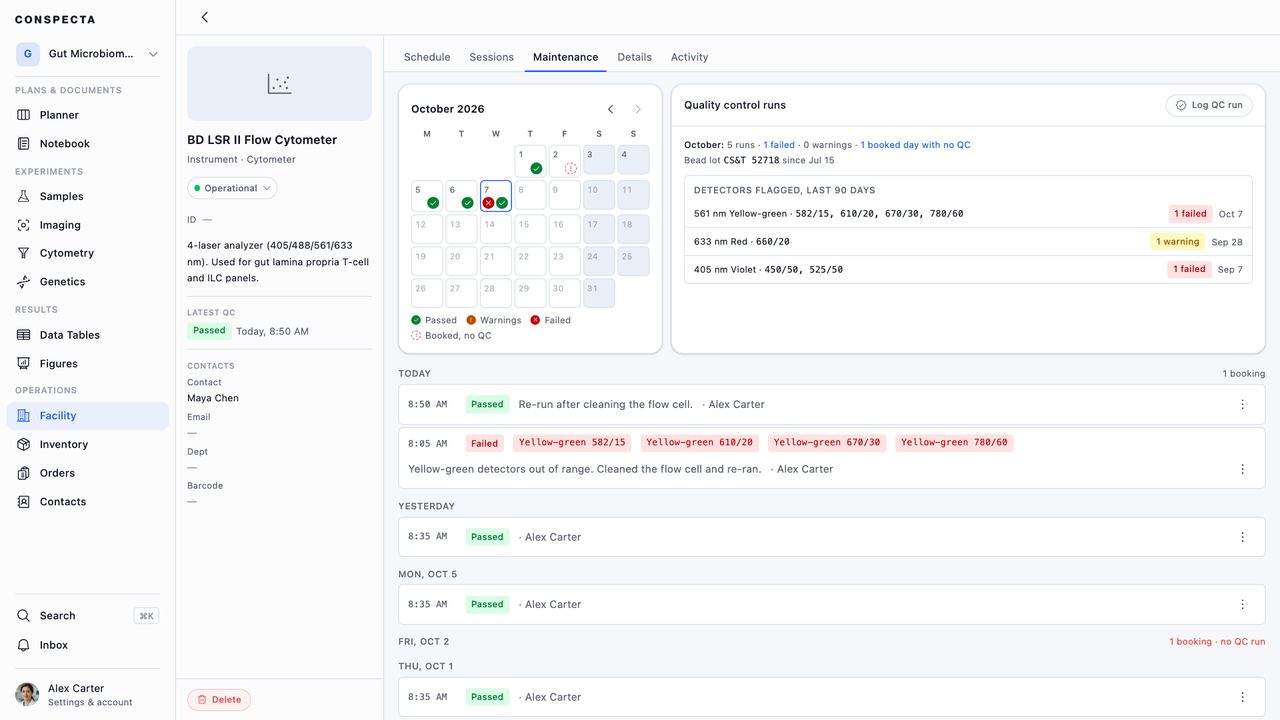
Show all runs brings the whole list back. Each day in the list shows how many bookings it had, and the sidebar shows the Latest QC on every tab.
Each run's ⋯ menu offers Edit run, Log again, View in Activity, and Delete run to the person who logged it and to team admins. Activity keeps a record of every edit and deletion.
Check a Cytometer's QC Before Booking
A cytometer whose latest run failed or passed with warnings reads QC failed or QC warnings on its card, unless it is Broken or due for maintenance, which shows instead. On its Schedule tab, a line above the week gives today's result, such as QC passed today at 8:50 AM, or says QC not logged today.
Usage and Billing
Every bookable location has a Sessions tab built around a billing period: last month, this month, or a custom range for quarters and fiscal years.
Tiles across the top total the period's booked hours, completed sessions, how many people used the machine, and, when operating hours are configured, its utilization. Below that, a table grouped by project, person, or month gives hours, session counts, cancellations, and each group's share of the period, so a facility manager sees who to charge and a group lead sees what their project owes. Expand any row to audit the sessions behind it.
Export usage offers two shapes. A summary mirrors the table as grouped, for billing, and individual sessions gives one row per session with date, times, duration, who booked, project, status, and notes, for auditing. Only completed sessions count toward hours, and canceled and released bookings are tallied separately, so a group that keeps reserving time and dropping it stands out.
Linking a Session to What It Produced
Once a session is over, expand it on the Sessions tab to see what the project recorded during that window: images, image sets, image analysis and cytometry runs, notes, and protocol runs. Each suggestion says why it's there, so "acquired 15:12 on LSRFortessa" means the file's own metadata carries both the time and the instrument's name. Link to session connects it. Nothing is linked automatically, so every link is one someone confirmed.
Exporting
Export, under the ⋯ in the Facility header, opens a dialog that asks three things:
| It asks | Under | The choices |
|---|---|---|
| How much | Scope | The view you have on screen under the current filters, or the whole facility |
| Which columns | Columns | Grouped into the location itself, its environment, growing conditions, asset details, position, compliance, who is responsible, and record |
| Which file | Format | CSV, or Excel with an Export Info sheet |
Each location carries the rooms and units above it in a Folder column, and the column names match what Import reads.
Select locations and choose Download in the bulk bar to export only those, or choose Download on one location's ⋯ in the list to export that location.
A large Facility export is the project owner's to run.
The whole-facility Excel workbook in Settings → Export produces the same locations with their types, statuses, temperatures, and conditions.